
Rechargeable Bicycle Light Systems Turn Night To Day!
 You know this trail as well as you know your TV remote, yet you flinch with every rogue shadow that passes under your wheels. Blasting through the trees and navigating the rock gardens with focused tunnel vision, you wonder how close that drop-off to the left really is.
Yes, you know this trail, but under the dim moonlight, you're riding it again for the first time.
Welcome to the world of night riding! Besides great fun, and a unique and exciting experience, night cycling is a fine way to fit your passion into a busy schedule. It's also a wonderful escape from the scorching sun and crowded trails.
A good light system turns night into day
For this type of riding, you need one of our powerful and reliable rechargeable lighting systems. These have the oomph to turn night into day and make even technical trail riding possible after dark.
They boast a powerful bulb(s) and a rechargeable battery that fuels the light for a couple of hours, at least. These are sophisticated systems with many features and a wide price range. In this article, we explain some of the differences to help you choose the right light.
First, a word about taillights
While some high-tech rechargeable lighting systems offer taillights, most come with a headlight only. That's because the most common use for these lights is off-road bicycling where a taillight is unnecessary.
 If you're using your superlight for road riding, either select a model with a taillight, or do what most people do and get an LED taillight to use with your rechargeable lighting system. These LED flashers are plenty bright, affordable, lightweight, easy to mount and reliable.
Lighting system configurations
For serious road and off-road riding you have a choice of helmet- or handlebar-mounted rechargeable lights, or if you want the ultimate, consider using both!
Helmet-mounted lights are generally the less-expensive option, ranging from $75 to $200. Handlebar-mounted lights start around $150 and go as high as $700, but there are numerous price points in between. And running both is obviously the most expensive option, however some light companies offer package deals at a reduced price.
There are advantages to both types of lights depending on how and where you ride. For serious nighttime off roading many riders feel it's best to use both.
Helmet-mounted lights generally use smaller and lighter batteries carried in a jersey pocket, hydration pack or backpack. These systems typically have one light and are available with incandescent halogen bulbs or long-lasting high-intensity bulbs. Using a NiMH (Nickel Metal Hydride) battery, these systems can run for one to four hours on a charge.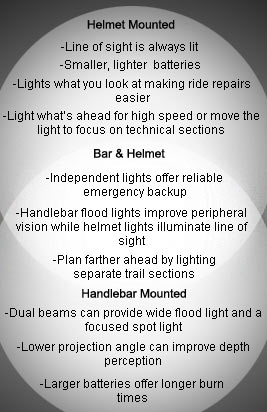
Using larger batteries often attached to the frame or stored in the bottle cage, handlebar-mounted systems provide more power and longer run times than most helmet-mounts. These systems can come with up to three light units with various combinations of flood and spot lights. These larger systems can produce up to 40-watts of power with burn times from one to seven hours.
When using handlebar and helmet lights, you may only need to switch both lights on for fast descents or technical sections. Conserving the battery power in your helmet light during slow sections or climbs leaves you with enough power in your helmet light to use it as an emergency backup for trailside repairs or unexpected delays. Remember, it doesn't hurt to end your ride with power to spare, but coming up short is a night-riding no-no. (The chart on the right shows how the lights compare.)
Technical considerations
Shoppers for bicycle lights today are sometimes surprised by the variety of systems available and the range of prices. This is due to the ingenious ways manufacturers optimize light output and battery power. And, how they build in features that make these lights perfect for cycling, such as ways to mount the battery. For those of you who are interested in the science behind the lights, we offer this next section. (You certainly don't need to master this information to get a nice light.)
Brightness
When considering bicycle lights, wattage is the most common unit used to describe a light's power and it's one way to gauge how much brightness a system offers. However, technically speaking, wattage is actually a measure of a light's power consumption, not really the amount of light that it produces. A lumen is the international unit for the actual amount of light that's produced, equal to the amount of light given out by one candle radiating equally in all directions.
This is an important distinction because, for example, a 10-watt H.I.D. light will produce more light (in lumens) than a 30-watt halogen light because an H.I.D. lamp uses its power (in watts) to produce light much more efficiently than halogen systems. The important thing is to realize that you can't go by watts alone in determining which is the best light. We're happy to point out the differences and recommend the best light for where and how you ride.
Battery types
There are 4 types of batteries found in rechargeable bicycle lighting systems today. In order of price (least to most), they are: Lead Acid, Nickel Cadmium (Ni-Cad), Nickel Metal Hydride (NiMH) and Lithium-Ion (Li-ion). Here's how they compare:
Lead Acid batteries are the most common power source on inexpensive lighting systems. Lead Acids hold their charge for longer periods between use, which is a valuable feature for an occasional night rider. They also dim gradually during use so you'll have some light even if the battery is fading. The primary drawback is about twice the weight of the better batteries for the same capacity. Also, they typically last between 200 and 400 charging cycles, whereas superior models will last through 300 to 2,000 cycles. Lead Acid batteries also lose more of their capacity in cold weather than the better ones.
Ni-Cads are popular because they're moderately priced, lighter and smaller than Lead Acids, less affected by weather, and are safely charged with simple chargers. A common misconception concerning Ni-Cad batteries is a problem with "memory." You may have heard that you need to fully drain a Ni-Cad battery otherwise it will remember where you began charging it and only retain that much capacity. This has never been proven in consumer batteries or cycling lighting systems.
NiMH batteries are significantly lighter, and even smaller than Ni-Cads meaning that they can provide longer run times without excess bulk. NiMH batteries, however, must be charged correctly. Whereas Ni-Cad batteries can handle continuous charging with relatively little effect, NiMH batteries can be damaged by overcharging. This is why NiMH powered lighting systems typically include "smart" chargers that protect the battery.
Li-ion batteries are the newest, and already among the most popular type found in consumer electronics because they boast one of the best energy-to-weight ratios, low maintenance, and no memory effect. Even better, they offer a higher power density, which means longer run times from a super-light battery (Lithium is the lightest of all metals). Another great advantage is that Li-ion batteries cannot be overcharged. Plus, they lose only 5% of their charge a month, so they're ready to go when you (or your buddies) are.
A drawback of Li-ion batteries is a fixed life cycle, independent of the number of charge/discharge cycles. This means that a 3-year-old Li-ion will have less run-time when fully charged than a new Li-ion battery that's fully charged. Also, as a new technology, these batteries often command a higher price.
Carrying batteries
Handlebar-mounted light batteries are usually strapped to the frame or fit into a bottle cage (photo, above). Batteries for helmet-mounted lights are usually strapped to the back of the helmet or fit into, or are clipped onto a hydration pack or backpack (or placed in your jersey pocket if you don't use a pack). We’ll gladly show you how both the light and battery attach if you have any questions about any lighting system.
Bulb types![]() Incandescent (inert filament bulbs): The basic premise of an incandescent bulb is to heat a small wire so hot that it starts to glow like coals in a campfire. The small wire, called a filament, is typically made of tungsten because of its resistance to melting and evaporation at the 4,000+ degree Fahrenheit temperatures required to produce light.
Incandescent (inert filament bulbs): The basic premise of an incandescent bulb is to heat a small wire so hot that it starts to glow like coals in a campfire. The small wire, called a filament, is typically made of tungsten because of its resistance to melting and evaporation at the 4,000+ degree Fahrenheit temperatures required to produce light.
When the light is switched on, the filament is essentially burning, so to control how fast it degrades, incandescent bulbs are either vacuum sealed or filled with inert gases, such as argon and nitrogen. Eventually the filament will burn to the point where the wire breaks and the light stops working.
The primary drawback of incandescent lights is that they're extremely inefficient. The energy that's used produces more heat than light, which means that they're not very bright and they require a lot of battery power to operate.
![]() Halogen (filament bulbs containing halogen gas): A halogen lamp also uses a tungsten filament, but the gases used to fill the bulb are from a group of elements known as halogens. These gases actually combine with the tungsten vapor as the filament burns and redeposit the tungsten back onto the filament. This recycling process preserves the filament and allows it to burn longer and hotter, meaning you get brighter light and a longer-lasting bulb.
Halogen (filament bulbs containing halogen gas): A halogen lamp also uses a tungsten filament, but the gases used to fill the bulb are from a group of elements known as halogens. These gases actually combine with the tungsten vapor as the filament burns and redeposit the tungsten back onto the filament. This recycling process preserves the filament and allows it to burn longer and hotter, meaning you get brighter light and a longer-lasting bulb.
However, incandescent and halogen bulbs both produce much more heat than light, which means that the power being supplied to the filament is not being used efficiently to produce light alone. The yellow hue of the light produced by a tungsten filament can also dull or distort the appearance of objects on the trail.
![]() H.I.D. - High Intensity Discharge bulbs: Also known as Metal Halide or Xenon Charged bulbs, H.I.D. ones use an electrical arc between two electrodes to ignite gases in a sealed bulb, rather than heating a filament to convert electrical energy into light. These lights produce a very bright-white or slightly blue light that's more intense and much closer to natural sunlight than incandescent light.
H.I.D. - High Intensity Discharge bulbs: Also known as Metal Halide or Xenon Charged bulbs, H.I.D. ones use an electrical arc between two electrodes to ignite gases in a sealed bulb, rather than heating a filament to convert electrical energy into light. These lights produce a very bright-white or slightly blue light that's more intense and much closer to natural sunlight than incandescent light.
Although they are sometimes called xenon lights, there are several types of H.I.D. systems and not all are xenon charged. Xenon is only added to some systems because it ignites more quickly and operates at lower temperatures to provide instant on/off functionality. Because they don't produce as much heat as a byproduct of producing light, H.I.D. bulbs use power up to three times more efficiently than even the best halogen incandescent lamps, which results in much lower power requirements and longer battery life.
However, some limitations of H.I.D. systems include up to a minute of warm-up time before reaching full power and replacing H.I.D. bulbs is more expensive than with incandescent bulbs. And although the working life of H.I.D. bulbs decreases with each use and turning them on and off frequently can damage them, H.I.D. bulbs typically last three to five times longer than halogen ones.
And now, some of our best night-riding light tips:
|
Basics |
|
|
Essentials |
|
|
Look out! |
|
We hope these tips help you find the perfect bicycle light and we look forward to showing you our excellent selection!